what type of brakes to get for shwinn

- Find Us Store
Mon - Sat: 11:00am - six:00pm Sunday: 11:00am - 3:00pm
Trickling downward from the motocross earth, disc brakes have at present become popular on off-road bicycles. Discs provide powerful and reliable braking in all types of conditions and terrain and so they're ideal for trail riding. Plus, different rim brakes, discs aren't compromised should you hit a hole or country hard and bend your bike. There are significant differences between discs and rim brakes, withal. So here we provide an overview of how discs work, the different types, and basic maintenance instructions. Dissimilar the soft rubber pads used on rim brakes, discs use hard metallic- or ceramic-based pads that are less affected past h2o, mud and heat to accomplish more consequent braking ability. Additionally, some disc brakes utilise hydraulics (instead of cables); for even greater stopping power.
disc restriction rotor
Types
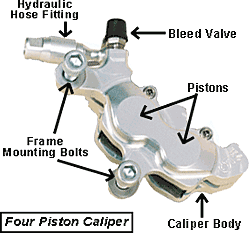
Mechanical Disc Brakes The main drawback to mechanical brakes is cable stretch, which causes a spongy feel, reduces braking power, and forces more than frequent aligning. Cables and housing are besides susceptible to rust, dirt, and debris buildup that can bind the braking organization. These issues are completely avoidable though. And the basic maintenance tips that we offer hither will keep your mechanical discs strong and reliable. Hydraulic Disc Brakes The advantage of hydraulic systems is being sealed (or "closed") so that water, dirt or debris tin can't compromise the brakes, making them very maintenance free once they've been properly installed. Also, hydraulic brakes accept a silky smooth feel at the lever and incredible gripping power at the business end. For drawbacks, hydraulic brakes must withstand extremely high force per unit area, then expert set-upward and frequent inspections are essential. The smallest air bubble or leak in hydraulic discs can crusade a loss of power or complete failure. And, the process of removing air from the braking organisation, called "bleeding," varies between individual systems and can be a delicate procedure. And then it's all-time to bring your bike in and have u.s. help. The Two Types of Calipers
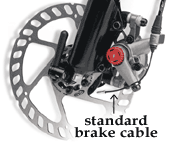 Mechanical discs use the aforementioned cables and housing plant on traditional cantilevers and V-brakes. Cables offer certain advantages over hydraulic systems, including simpler installation and adjustment, lighter weight, and less complicated maintenance (cables tin can exist found at any bike shop and are less expensive than hydraulic lines).
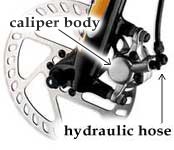 Hydraulic discs feature a closed system of hoses and reservoirs containing special hydraulic fluid to operate the brakes. When the lever is activated, a plunger pushes the fluid through the hoses and into the caliper where the pads are pushed onto the rotor, stopping the bike.

Maintenance and Troubleshooting
Likewise, when replacing whatsoever parts or fluids, it's crucial to make sure everything is compatible. And, because brakes are so important for safety, we practise not recommend working on them unless you're confident in your ability to do the job right.
If you lot have any questions almost disc brake adjustment please call or bring your bike in and we'll be happy to help.
Inspecting And Cleaning The Rotors
Dingy, warped, cracked or otherwise damaged rotors are a mutual crusade of brake failure. Rotors are rarely perfect, simply if you observe excessive wobbling (more than 1mm), cracks or gouges in your rotors, supplant them immediately.
A significant loss of braking power can also exist caused by muddied or oily rotors or pads. Make clean rotors and pads using only isopropyl booze. Other cleaners/degreasers can contaminate and impairment the rotors or pads. If cleaning does non restore your braking power, supersede the pads immediately.
Squealing or noisy brakes is another common problem. It can be caused by loose bolts so showtime by checking all the bolts on the rotors and those attaching the calipers to the wheel. Dirty pads may cause noise, too, then go on them clean. Still squealing? Check the alignment of the calipers over the rotors (come across "centering the calipers" below).
To check the rotors for dents or warping, spin the bicycle and watch the rotors as they rotate by the pads. As long as the rotor does not rub, a slight lateral motility is acceptable. If the rotor rubs the pad in a spot, tap information technology lightly with a rubber or plastic hammer, or place a clean rag over the rotor and bend it slightly with an adjustable wrench. It doesn't accept much, so don't overdo it!
And remember: Never touch the braking surface of the rotor or pads with your bare hands because the oils on your fingers tin can decrease braking ability. 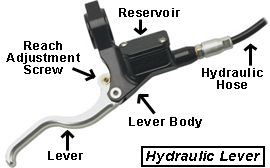 Adjusting Lever Achieve
Many new brake systems include adjustable-reach levers that allow customizing the distance from the handlebar grip to the brake lever. This usually involves turning a screw or bolt that connects the restriction lever to the body.
If the reach distance to each lever is uneven or one lever pulls farther than the other, try to equal out the travel past dialing the lever limit screws in or out (phone call or cheque your owner's manual for specific instructions). If the lever however feels spongy or pulls all the way to the bar, there may be air in the hydraulics. Time to bring information technology in and accept u.s.a. bleed the system. Finally, inspect all of the hydraulic hoses and fittings for leaks. If you observe a leak, bring your bike in to us immediately.
Checking Brake Pad Wear
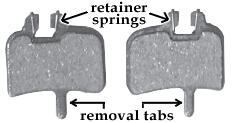
Removal: With the wheels removed, use your fingers or needle-olfactory organ pliers to grab the removal tabs extending below the inner brake pad (photo). Depending on the brake system that you're using, pull i or both pads direct out and toward the center of the caliper trunk until they're completely removed. The pads may likewise have retaining springs or magnets property them in place that may come up out.
Inspection: If the remaining padding is thinner than the thickness of a nickel, you'll demand new pads after a few more rides. If the pads are thinner than a dime, modify them immediately. Insert the new pads into the caliper body the same way they were removed, making certain that the pads sit fully inside the caliper body. Alert: Do not affect or spill any fluids on the pads as peel oils or other fluids can cause a loss of braking power.
Centering The Calipers (Preventing Restriction Elevate)
The rotors need to be centered in the calipers to maximize braking power, eliminate drag and minimize noise.
Some brakes apply shims or thin washers on the caliper mounting bolts. For these brakes, add or remove shims to centre the caliper over the rotor.
Another popular mounting system uses a two-function bracket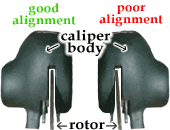 . To arrange the caliper position on these brakes, loosen the ii centering bolts that attach the caliper to the mounting bracket, apply the brake lever and tighten the bolts. Hint : Endeavor slipping business cards between the rotor and pads earlier applying the brakes to assist center the calipers.
While applying the brake, it may also help to gently shake the caliper body so information technology comes to residual in a centered position, then tighten the mounting bolts. Finally, spin the wheel and check if the rotor is centered. Repeat the adjustments if necessary.
Pre-Ride Cheque List
- Inspect the brake rotors for dirt, debris, or fluids. Clean with alcohol if necessary.
- Spin both wheels and brand sure the brake rotors are directly and not rubbing on the pads.
- Clasp both brake levers to check for proper lever travel and solid pad contact with rotors.
- Inspect all hydraulic hoses and fittings for leaks once a calendar week and before each ride.
At present Become Ride!
Source: https://www.sunsetcyclery.com/how-to/disc-brakes-101-pg131.htm
0 Response to "what type of brakes to get for shwinn"
Post a Comment